


In today's digital age, deploying a dynamic website is a crucial step for businesses and developers alike. Microsoft Azure provides a robust platform for hosting websites, and using an Azure Virtual Machine (VM) with Internet Information Services (IIS) Server is a popular choice for many. This blog post will guide you through the process of deploying a dynamic website on an Azure VM using IIS Server.
Table of Contents
Introduction to Azure VM and IIS Server
Prerequisites
Step 1: Create an Azure Virtual Machine
Step 2: Configure the VM for IIS Server
Step 3: Install and Configure IIS Server using PowerShell
Step 4: Deploy Your Website
Step 5: Monitor and Maintain Your Website
Conclusion
Differences between webservers
1. Introduction to Azure VM and IIS Server
Azure Virtual Machine (VM)
Azure VMs are scalable computing resources provided by Microsoft Azure. They allow you to run a wide range of operating systems and applications in the cloud. Azure VMs are ideal for hosting websites, especially when you need full control over the environment.
Internet Information Services (IIS) Server
IIS is a flexible, secure, and manageable web server from Microsoft that is used to host websites and web applications. It is highly configurable and integrates well with other Microsoft technologies, making it a popular choice for hosting dynamic websites.
2. Prerequisites
Before you begin, ensure you have the following:
An active Azure subscription.
An ecommerce website ready for deployment (e.g., ASP.NET, PHP, etc.).
Basic knowledge of Azure, IIS, and networking concepts.
Remote Desktop Protocol (RDP) access to the Azure VM.
3. Step 1: Create an Azure Virtual Machine
3.1. Log in to Azure Portal
Go to the Azure Portal.
Log in with your Azure credentials.
3.2. Create a New VM
Click on "VM " in the top-hand menu.
Select "Compute" and then choose "Virtual Machine."

Fill in the required details:
Subscription: Choose your Azure subscription.
Resource Group: Create a new one or select an existing one.
Virtual Machine Name: Enter a name for your VM.
Region: Choose the region closest to your users.
Image: Select a Windows Server image (e.g., Windows Server 2022 Datacenter).
Size: Choose an appropriate VM size based on your website's requirements

.
Set up the Administrator account:
Username: Enter a username.
Password: Create a strong password

.
Configure networking settings:
Virtual Network: Create a new one or use an existing one.
Subnet: Default is usually fine.
Public IP: Ensure a public IP is assigned.
NIC Security Group: Allow RDP (port 3389) and HTTP (port 80) traffic

.
Review and create the VM

.
4. Step 2: Configure the VM for IIS Server
4.1. Connect to the VM via RDP
Once the VM is created, go to the VM's overview page in the Azure Portal.
Click on "Connect" and download the RDP file


.
Open the RDP file and enter the Administrator credentials to log in

.
4.2. Update the VM
Open the Start menu and search for "Windows Update."
Check for updates and install any available updates to ensure your VM is secure and up to date.
5. Step 3: Install and Configure IIS Server using PowerShell
To install IIS (Internet Information Services) on a Windows Server using PowerShell, you can use the following command:
Install-WindowsFeature -Name Web-Server -IncludeManagementTools
Here's a breakdown of the command:
Install-WindowsFeature: This cmdlet installs one or more roles, role services, or features on the local or a specified remote server.
-Name Web-Server: Specifies the name of the feature to install, in this case, the Web Server (IIS).
-IncludeManagementTools: Includes the management tools for IIS.
Make sure you run PowerShell as an administrator to execute this command successfully


.
6. Step 4: Deploying the Website
6.1. Prepare Your Website Files
Ensure your website files are ready for deployment.
If using a database, ensure it is configured and accessible from the VM.
6.2. Deploy to IIS


Now copy your website files from your local device to the VM.


now go back to the default web site home
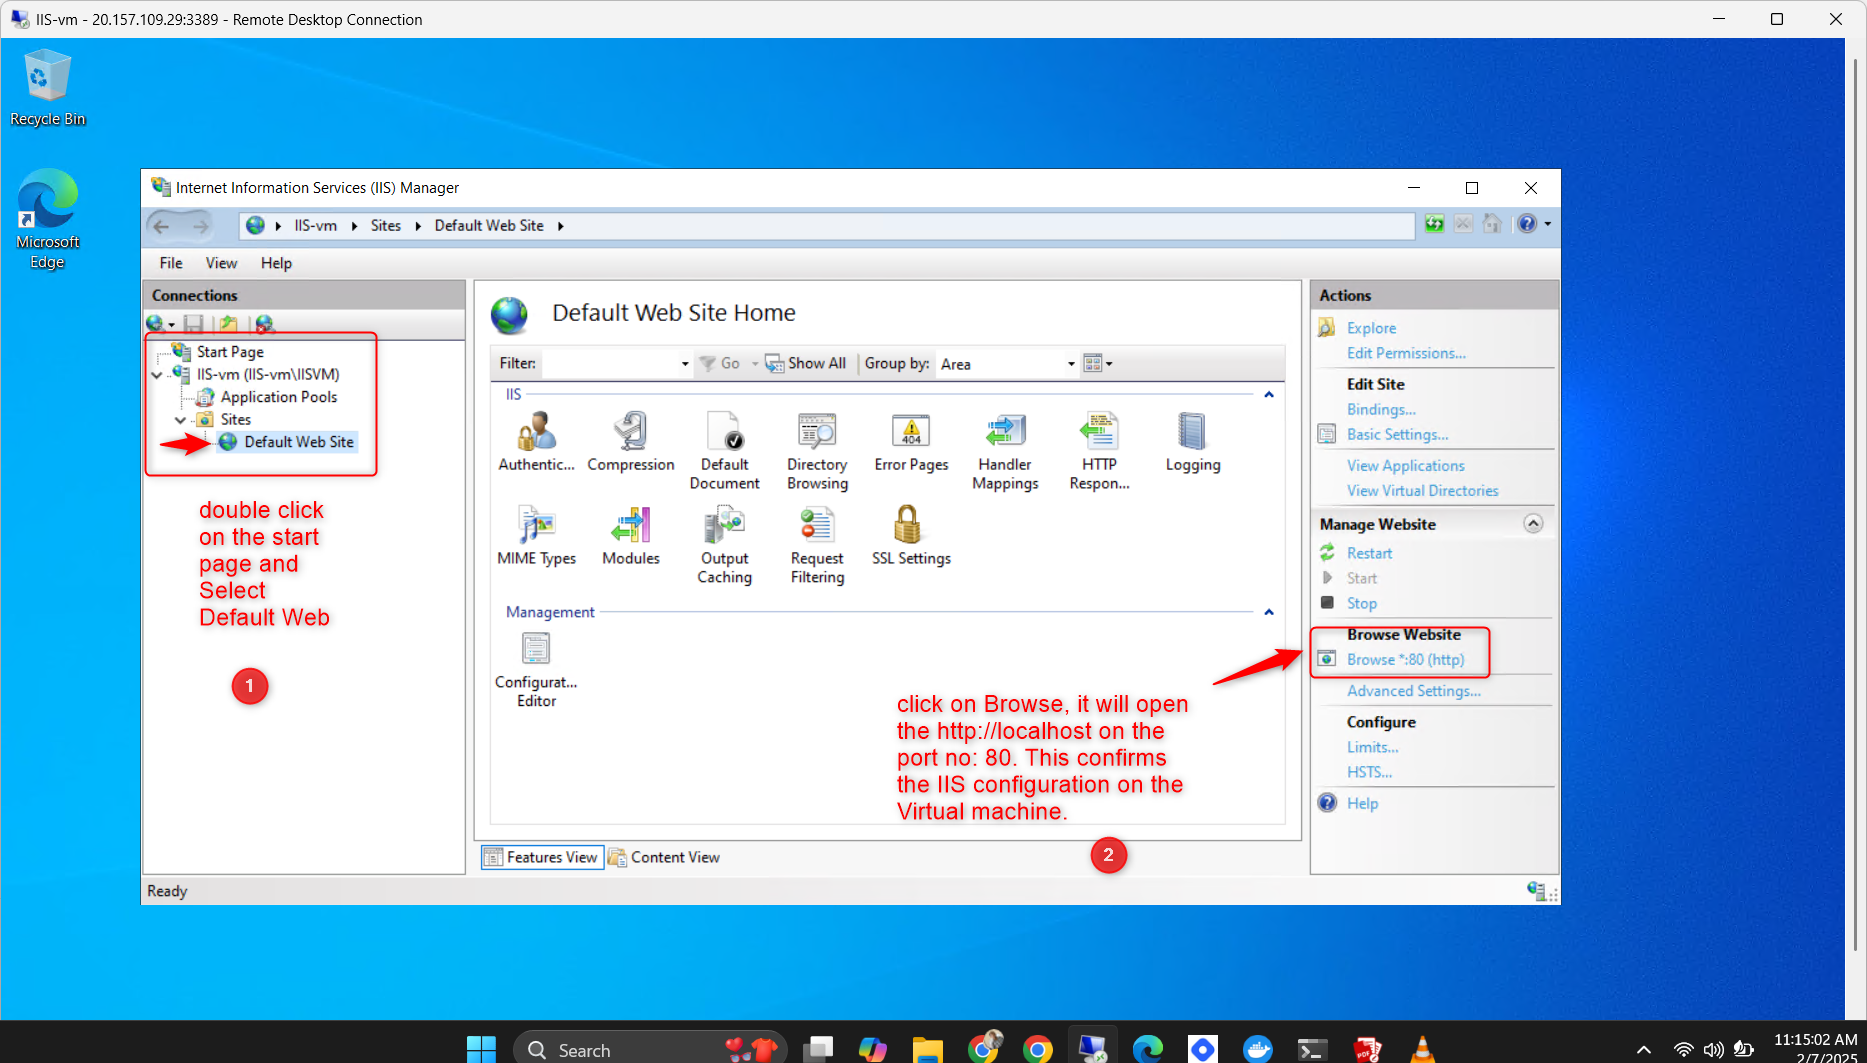

Now, we are going to access the website using the public IP of the VM. Go back to Azure portal to get your VM public IP address.


7. Step 7: Monitor and Maintain Your Website
7.1. Set Up Monitoring
Use Azure Monitor to track the performance and health of your VM and website.
Set up alerts for critical metrics (e.g., CPU usage, memory usage)

.
7.2. Regular Maintenance
Schedule regular backups of your VM and website.
Monitor logs for any security incidents or performance issues.
Scale your VM as needed based on traffic and resource usage.
8. Conclusion
Deploying a dynamic website on an Azure VM using IIS Server is a powerful and flexible solution for hosting web applications. By following the steps outlined in this blog post, you can set up a secure, scalable, and high-performing website on Azure. Remember to regularly monitor and maintain your deployment to ensure optimal performance and security.
Whether you're hosting a small business website or a large-scale web application, Azure VMs combined with IIS Server provide the tools you need to succeed in the cloud. Happy deploying!
PLEASE NOTE: There are other things to do before finally deploying the site to the public. Such as setting the SSL CERTIFICATE and the Domain name system (DNS). Also creating additional applications pool when adding more websites to the server.
9. DIFFERENCES BETWEEN VARIOUS WEBSERVERS
Summary of Key Differences:
| Feature | IIS | Apache | Nginx |
| Platform | Windows-only | Cross-platform | Cross-platform |
| Licensing | Proprietary (Windows) | Open-source | Open-source |
| Performance | Good for Windows apps | Resource-intensive | High performance |
| Configuration | GUI and XML-based | Text-based config files command line | Text-based config files command line |
| Supported Tech | ASP.NET, .NET Core, MSSQL | PHP, Python, Perl, etc. | Multiple languages |
| Security | Integrated with Windows | Highly configurable | Strong against DDoS |
| Community | Microsoft-supported | Large community | Large community |
| Use Cases | Enterprise, Windows apps | Shared hosting, dynamic | High traffic, reverse proxy |